

Why and how we have built a DIY watermaker
We wanted a watermaker. I made my own and started with a Kärcher Pressure Washer for about 80 USD. Here you find the all the details that you are usually not told until you make your own mistakes. For about 1,000 to 1,500 USD you get a working system.

The KAPETAN MRS is one of the water tankers that bring potable water to the Croatian islands. Mediterranean climate and karst geology make most of the islands dry.
We need water.
During summer, we spend 6 to 8 weeks on the Adriatic. Anyone who has three kids knows that 65 liters (17 US gall.) of fresh water is practically nothing. It lasts for 24 hours, if you take care maybe 48 hours. When you need water assumingly you would simply go alongside somewhere and top up your water tank. Not so on the Adriatic: The islands there are short of water anyway, due to the climate. Furthermore, there are water taps not in every harbor at the pier. If there are any, you need the right adaptor and an endless hose. If you have all this, it is not yet sure that the water is on when you are there or that there is any vacant berth close enough to the very few taps or that the existing tap is unlocked and you need to find someone with a key. And finally, if you have this all, you will be charged ridiculous high prices. In marinas, the situation is of course better - and they charge you even more. This however is totally understandable as there are thousands of boats during summer, and all of them need water ...
Usually you get water more easily when you are at the gas station bunkering diesel, but we only need diesel about every 10 days.
Thus, our strategy for water supply was: take a 25-liter canister (6 gall.) when going out for dinner and carry it back to the dinghy, with your arms getting longer and longer. To cut it short: Water turned out to be a major problem for showering and doing minor laundry.
We do not stay in marinas for overnight but prefer remote and picturesque anchor bays. Lying at anchor we talked to other boaters how they managed this challenge. There solutions were straightforward: much bigger tanks (no option for us), no kids (ha-ha!), or – a watermaker on board!
Watermaker turned out to be a magic word. I had heard about it before but no clear idea how it works exactly, nor how much this would cost. Those boaters who had one told us: take into consideration some 3 to 5 thousand Euro (4 to 6 thousand USD). Before the dream was really dreamt it started to vanish.
Back home by the end of summer I started to google around. After a few days, I understood that one could build a DIY model for around 2000 EUR / 2500 USD. This sounded also very much, it was, however, within what we were willing to invest for fresh water available when and where we'd like. At the end, it turned out to be even less.
How does it work - in two sentences?
Reverse Osmosis: Seawater is pumped through a membrane at high pressure (55 bar / 800 psi). You get 20% fresh water, 80% goes overboard again as brine.
A few more details about our DIY installation
(Many technical details and instructions that I found when searching the internet are listed at the end of this article. So here I'll rather describe my experiences and challenges during the project.)
Energy, Energy
Most important is the energy-question: You need a pump that makes 55 bar / 800 psi pressure and has a flow rate of about 5 liters per minute / 1.3 gpm or more. Typically, this will be a plunger pump that you might know from the high-pressure washer at your garage or at home for pressure washing your car etc. Such a pump needs about 1500 Watt or about 2 hp.
- You may use an AC-motor and a DC-AC-inverter,
- or you may use a 12V DC motor,
- or you may use the boat's main engine and a belt drive with a clutch, similar as the compressor of the A/C in your car works.
All three methods are similar in terms of costs, the main engine driven version is certainly the most attractive one: no additional equipment necessary, no heavy electric loads (1500 Watt from 12 Volt DC means 125 Amps and wires as thick as a finger!).
 Dido's engine compartment, however, makes a main engine driven pump very complicated due to space restrictions. So, I decided to install the DC-AC-inverter. Rough calculations convinced me that the 50 Amps alternator of our Solé Diesel had to be replaced by something bigger. I found a 110 Amp alternator that would fit. Furthermore - as I wanted to top up the batteries quickly (the alternator would only provide 2/3 of the energy necessary during water making, the rest would have to be taken from the batteries) - I installed a so called "alternator-to-battery-charger" (A2B), which charges the batteries really incredibly fast (there is an article about this available here also).
As mentioned, the sea water is pumped through a membrane. Under optimum conditions the membrane itself is capable of producing almost 110 liter / 30 gall. fresh water per hour if you provide a pump with a flow rate of 7 to 8 times as high. A pump of such a flow rate (12 lpm / 3 gpm) needs about 5 hp, it is big and heavy, and it is horribly expensive. Together with an AC-engine or an electro-magnetic clutch and a belt drive a seawater resistant pump will cost about 1200 Euro / 1500 USD, maybe more.
Pipes and threads and valves and hoses and BSP and NTF and inch and millimeter ...
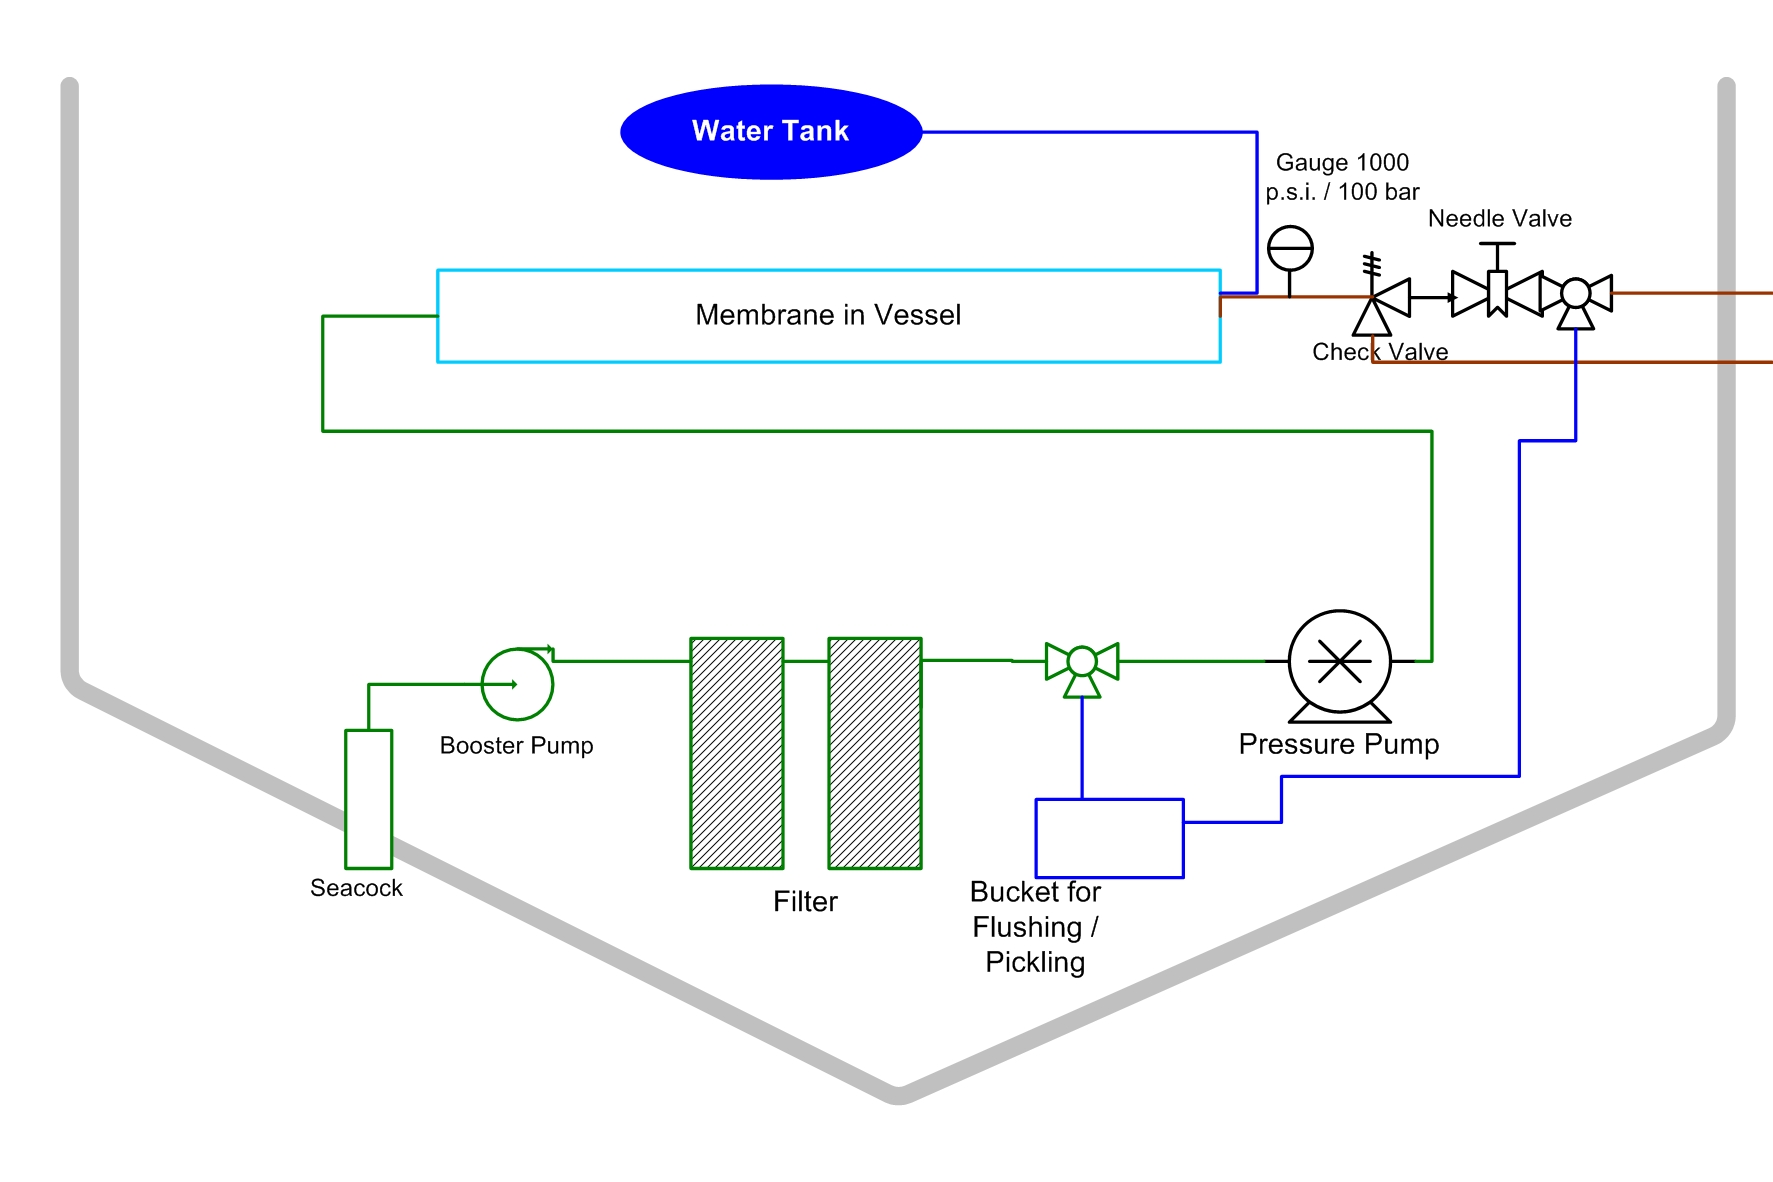 The membrane is within a tube (called high pressure vessel), the vessel has 3 openings with threads to screw fittings into. Then you need a high-pressure needle valve to adjust the pressure, a relieve valve for security reasons, 3-way-valves, hose connectors, bows, filters with connectors and threads, and and and. All of them should be seawater resistant.
When I looked for them in the internet I found items for 10 USD and for 100 USD doing the same thing. I wanted to understand the differences (which turned out to be a time consuming and anyway useless hobby. Some parts are the same but without a stamp that says: "medical proof" or "may be used in nuclear power plants" whereas others are intended to be used in agricultural machines or pressure washers). Putting together the most reasonable parts turned out to drive me mad: one part had a 1/4" NPT thread and should be connected to a 1/4" BSP thread. Then there is a 1/4" NPTF that should fit onto 10 mm. some of them are self-sealing, some of them need a sealant, some of them for hydraulics, others for gas, others for marmalade or so.
One inch equals 25.4 mm, but if you measure a 1" pipe you find that it is 25.4 mm neither inside nor outside. Same is true for 1/4 inch, 1/2 inch, or 3/4 inch. You may measure any way, you will never find one inch when you measure a 1" pipe or hose or thread. I felt confused to a certain extent.
I studied anthropology at university not any technical sciences, and I suddenly understood why the NASA once lost a space probe on Mars due to the fact that in a computer landing software they mixed up meter and feet. Thus, I thought, if this happens to NASA engineers why should I do better. So, I ordered many parts at least twice. My workshop is full of brand new parts now that might make a small rocket or at least a chemical laboratory.
But finally, the foot bone was connected to the ankle bone, the ankle bone connected to the shinbone, the shinbone connected to the knee bone and them bones walked.
The Basic Scheme
The High-Pressure Pump
The critical question still was the pump: I already had a few offers for plunger pumps of around 1200 USD when I occasionally read in a sailing newsgroup (I have become member in dozens of newsgroups during this research) that someone used a standard low-cost ordinary high-pressure washer from Kärcher for 70 USD without problems. The idea attracted me immediately: 70 instead of 1500 motor included! So, I tried to find out why not everyone is doing this and what would be the disadvantages.
Very obviously, the ordinary high-pressure washers use the same plunger pumps, however the material of the pumps is different: The watermaker pumps are made from stainless steel and / or seawater resistant bronze, whereas the "normal" pumps are made from brass and aluminum, to explain it the simple way.
Kärcher Pressure Washer
 Now, the sailor who experimented with the Kärcher wrote that especially the very cheap washer pumps are made mainly from plastic, so the corrosion problem should not be one. I did not disassemble one to find out but I thought I should give it a try. If such a pump only would last for 6 - 8 weeks’ holidays I could buy a new one every season for ten years and still save half the money of a CAT pump or something similar. Further, I said to myself, as I am not bluewater sailing the worst-case scenario is that the pump refuses to work after a certain number of days and I will be where we were before: canisters and long, long arms ...
Another limitation of such a pump is the flow rate. The maximum pressure (100 bar or 1450 psi) is far beyond what we need and will cause no trouble, but the maximum flow rate is stated as 340 liters per hour or 90 gph. This equals 5,5 liters per minute or 1.5 gpm. When actually running, I estimated that it probably would be rather 4 liters or 1 gpm.
With these figures the calculation goes like this:
Nominal pars of the membrane:
Maximum feed rate: 23 lpm / 6 gpm
a) Maximum permeate rate at water temperature of 25°C / 77°F 108 lph / 28.5 gph
b) Maximum permeate rate at a water temperature of 20°C / 68°F 90 lph / 24.5 gph
c) Maximum permeate rate at a water temperature of 15°C / 59°F 76 lph / 20 gph
With the Kaercher Pump installed the results should be:
Maximum feed rate of the Kärcher pump: 4 lpm / 1 gpm
a) 19 lph / 5 gph
b) 16 lph / 4 gph
c) 13 lph / 3.5 gph
 This means: for our “spring trip” in April/May (sea still cold) we should expect about 13 liter or 3.5 gph, for our summer trip (water warmer) we should expect about 19 liter or 5 gph fresh water with the Kärcher pump. The watermakers “from the shelf” with their expensive plunger pumps and the same membrane produce twice as much water the brochures say. But anyhow, still not bad for that money.
So, I went to the Home Depot, bought one of those 59.95 Euro Kärchers, opened it and took off the pump/motor-unit. I connected it to the referring hoses (again: various different threads), turned on the water and electricity – and them bones walked!
The “test drive” at home with homemade seawater proved that the system worked. The first glass of “permeate” as the fresh water coming from the membrane is called tested like – water! Now the final question was: would the system work on board under real life conditions?
Fresh Water Made by Dido for the First Time
For our annual “boys’ trip” we went to the Croatian Adriatic as usual. Dido was lifted into the water and we left the harbor without a drop of fresh water in the tanks, fully relying on the watermaker (well, we knew the other day we would be in a harbor where we could get water – just in case). After we were a bit away from the shore I turned on the autopilot and then the watermaker. I adjusted the pressure to 55 bar / 800 psi by means of the needle valve and controlling it by the pressure gauge, and the water started to flow. We had to fill up the tank in the bow and an additional 30 l / 8 gall. canister, all together about 95 l or 25 gall.
It took about 3 hrs to get them full. So, the production rate was far above expected. But why so? Assumingly the flow rate of the Kärcher is actually higher than expected when operated below pressure-washing pressure of 100 bar / 1450 psi. Water temperature was as expected – cold, and the salinity in the Mediterranean is anyway higher than anywhere else (3.6%). So, the only remaining variable is the flow rate of the pump.
I was surprised to the positive. Still the question how long the Kärcher would do service was bothering me a bit. We were 8 days on the water, and during this time the watermaker was running each day for about an hour. During this hour, it supplied us with about 25 to 30 liters (6.5 to 8 gall).
Although the Kärcher is built in somewhere in the bilge one cannot ignore it. It is noisy. With a few further measures it will certainly be more silent. But anyway, this is a price that we are willing to pay for an incredible increase in comfort: washing dishes with fresh water, showers that deserve this name instead of a seeping hose on the stern platform, shaving every morning, no more long arms due to heavy water canisters, no more searching for places where one can do some laundry, …
The actual costs
Learning is expensive. I bought material that turned out not to be necessary or adequate. So, I had to buy twice in some cases. I found some parts that were cheaper after I had paid for the others. But without taking all this into consideration, the costs for Dido’s watermaker were 1,300 EUR / 1,500 USD.
What is not included but necessary? Well, power supply. In our case, we had to buy a DC-AC inverter of adequate size, which cost about 400 EUR / 500 USD. This is a must but also a nice-to-have for other things on board. Most boats will already have one, but maybe not one that is powerful enough for the watermaker.
For safety reasons, we also built in a stronger alternator for 250 USD and a Sterling A2B charger for about 350 USD.
Flushing, Pickling, Maintenance
Since I first talked about our watermaker I was surprisingly often asked about the maintenance procedures, more than about costs or technical issues. Although these things are very well documented in the membrane manuals let me spend a few words on it.
Basically, the membrane is self-cleaning to a very high degree. When you use it every day it needs only little care. So, what do you really have to do then and what do need therefore? Practically maintenance means three possible actions: 1) simply flushing with fresh water if you are going to shut down the watermaker for more than 24 hours in order to reduce the chance of bio-fouling. 2) Sanitizing / disinfecting if you are going to shut it down for more than 48 hours. Each action takes about 10 minutes. 3) Thoroughly cleaning the membrane (without de-mounting but with flushing with chemicals) in case that the performance (fresh water production) goes down significantly.
 How to flush with fresh water and how to disinfect?
You need a bucket, a bowl or alike of about 2 gall. The installation has 3 3-way-valves with hoses on each valve outlet for flushing, sanitizing, and cleaning. These three hoses are: Feed water inlet (instead of seawater you take water from the bucket), fresh water outlet (instead of pumping the product water into the tank you pump it into the bucket), brine outlet (instead of pumping the brine overboard you pump it into the bucket).
Flushing
For flushing you fill the bucket with fresh water, put the three hoses into the bucket, close the seacock so that no more salt water comes in, and you pump half of the fresh water from the bucket through the watermaker and overboard. So, all seawater from the strainer, filters, pump, hoses, and the vessel should have gone overboard and the installation should be now filled with fresh water. Then you turn the 3-way-valves into the right position and simply circulate the remaining fresh water from the bucket through the complete apparatus for a couple of minutes. End of the story.
Disinfection / Sanitizing
This is absolutely the same procedure as flushing; however, you add a disinfectant to the water in the bucket. The appropriate disinfectants you will find in the documentation.
Cleaning
My experience is: many people feel stress when they hear terms like “alkaline, muriatic, acidic, hydroxide” etc. But believe me: It is like removing scale from your electric kettle. You put something into the water and give the whole thing some time. Then you rinse with water. Right? It is really that eas also with the watermaker.
 When performance goes down this may have basically two reasons: The membrane is clogged either by minerals (scale, magnesia, iron, or whatsoever, depending on the seawater quality), or by biological residue, such as algae or bacteria. This is what is called “fouling”.
In order to get rid of the clogging substances you do the very same procedure as described in “Flushing”, and you add chemicals to the water: 1) you add a very alkaline substance, like caustic soda = sodium hydroxide. You circulate it for a while. Then you flush the installation with fresh water and 2) you add a very acidic substance, like muriatic acid or citric acid and circulate it for a while. Finally, you flush it again with fresh water.
Reportedly one would clean the membrane once a year before winterizing everything although it probably might not be really necessary.
How to actually build your own watermaker?
 AmericanRO.com") In the internet, you will find instructions that cover everything for about 10 USD. To my estimation, you can save this money. You easily will find several comprehensive instructions on the link list for download, and much other material, too. The biggest challenge will certainly be to get all the parts for reasonable prices. This will probably cost you hours of research in the internet. I only have European suppliers on my list apart from membrane and vessel, which I ordered in the US, as this was much cheaper although shipping and customs had to be added. But by this research you will save hundreds of USD.
In the internet, you will find instructions that cover everything for about 10 USD. To my estimation, you can save this money. You easily will find several comprehensive instructions on the link list for download, and much other material, too. The biggest challenge will certainly be to get all the parts for reasonable prices. This will probably cost you hours of research in the internet. I only have European suppliers on my list apart from membrane and vessel, which I ordered in the US, as this was much cheaper although shipping and customs had to be added. But by this research you will save hundreds of USD.
What I did, particularily
I bought one pressure vessel and one SW30-2540 Filmtec membrane, both from AmericanRO.com. I bought the smallest Karcher Pressure Washer at the local Home Depot. I bought a 12V-Jabsco heavy duty feed pump. I bought a DC/AC-inverter to run the pressure washer, a small device from the local Radio Shack to control the RPM of the pressure washer, and a box full of fittings, pre-filter housings, filters, hoses as on the Excel-list that you may download. These things cost around 1,000 to 1,200 USD altogether. Additionally, I bought a stronger alternator (110 Amps) and a charge booster (Sterling A2B) to top up the batteries faster (these two items have only little to do with the watermaker. Depending on your boat you may not need them at all).
Links:
Here are the most interesting resources that I found when searching the net for our watermaker. (Should links be broken or sites be down, let me know. I have them all as PDFs also.)
www.sail-world.com/33568/ "The World Cheapest Watermaker"
https://sublimesustenance.files.wordpress.com/2012/03/how-to-build-your-own-watermaker.pdf A short but comprehensive DIY-guide
http://msdssearch.dow.com/PublishedLiteratureDOWCOM/dh_095b/0901b8038095b91d.pdf?filepath=/609-00071.pdf&fromPage=GetDoc or google for 609-00071-1009, which is the internal number of the DOW documentation covering everything about desalination, It is rather a book: 181 pages.
http://www.svsoggypaws.com/files/presentations/Making_Your_Own_Watermaker-Dave_McCampbell.pdf A very recommendable guide to a DIY-watermaker.
Those who are in Europe and want to buy in a "One-Stop-Shop" should visit Rainer, a friend who picked up the Karcher Water Maker idea and made a business out of it: https://watermaker.jimdo.com/ The prices are reasonable, Rainer is a reliable guy.
Below is a parts list of all the parts that I needed plus prices and where I bought them (this is a German list, as I bought everything in Germany - apart from membrane and vessel).
Some elbows, hose clamps and so on may be still necessary, according to the details of your actual installation.
The item numbers in the parts list refer to the parts on the WM Scheme.pdf.
Update after the first experiences: August 2010
We were on holidays on the Adriatic for six weeks and the logbook says we produced 3000 liter / 800 US gal. of freshwater during that time. The average flowrate on the permeate side was 0.8 to 1.0 liter per minute (48 to 60 liters or 12 to 16 US gall. fresh water per hour) with the Karcher pump regulated down to approx. half the performance with an additional electronic control device (costs about 20 EUR / 25 USD). So, this is a result that one may expect realistically. This electronic control turned out to be very useful: It allows a "soft start" of the pump, which reliefs the DC-AC inverter, one may control the Amp draw, and at - presumably - two thirds of full-performance of the pump the noise is reduced considerably to about one third of full-performance.
On the life-span of the Kaercher Pump we still have to work. The watermaker had been shut-down from May until July. During that time the whole installation was filled with the recommended pickling fluid. When we put it into operation again in July, the pump leaked after several hours. I had a spare pump on board and exchanged it (a task of 5 minutes). The rest of the time the watermaker worked flawlessly.
I changed the operating style: Before that I would start the watermaker, produce water, and then simply shut it down, intending to use it the following day again. After the pump exchange I modified the way of operation: After each use I flushed the system with fresh water (product water), so that the pump would be filled with fresh water. This, I estimated, should help, as the household pressure washer should be designed to be filled with fresh water continuously.
When back home I disassembled the leaking pump to understand what had happened. One of the steel plungers (i.e. a small piston) was corroded and had got stuck in the plastic cylinder. Although the plungers are made of SS, the grade is obviously not that high. Moreover, one has to take into consideration, that the recommended cleaning/preservation dissolution is a weak acid (Sulfuric Acid). Thus, it is also likely that this caused corrosion.
At the moment, I am not yet sure whether it was the lack of flushing after use, the acidic disinfectant, or both - or neither, that caused the malfunction. I am working on it and shall report.
Here are some photos from the Karcher's interior:


Modifications in 2011
We were happy with the Kärcher-solution. Without thinking much I simply bought a new Karcher, just to make sure that it would work throughout the whole summer, and it did. The “new” way of operating it (flushing after each use with about 5 l / 1 ½ gal. of fresh water, thus making sure that fresh water is inside of the Karcher most of the time). So, the concept turned out to work perfectly for our needs. During 2011 again more than 3,000 l / 800 gal. fresh water were produced. I made the installation “looking nicer” with a more appropriate panel. And I optimized the electrical installation, which turned out to be a task of its own. What had happened?
 security valve, high pressure gauge, needle valve, RPM-control for the HP-Pump, ON/OF switches for the boost pump and the HP pump, cocks to control the permeat flow") Just to recall:
Just to recall:
- The Karcher (1.4 kW) draws roughly 110 Amps at full load.
- The alternator delivers 110 Amps nominally (i.e. at full rpm and when “cold”, which means at about 20°C / 68°F).
There are no “nominal conditions” on board. The engine is usually running at 1600 rpm (cruising) instead of 3000 rpm (WOT), the temperature in the engine compartment is rather 60°C / 140°F. The alternator heats up to about 100°C / 212°F when under full load conditions.
, orginal 55 Amp alternator (blue)") Under these conditions two things happen:
Under these conditions two things happen:
- The output of the alternator goes down gradually when temperature goes up.
- When the alternator gets close to 100°C / 212°F the Sterling “power charger”, which boosts the batteries, switches to normal mode. The effective output of the alternator then is rather some 40 Amps instead of 110 Amps.
So, after a while the batteries go down although there are more than 300 Amp hours aboard of Dido. This is so because of the so called “Peukert-factor” (Pf). The Pf means: If a battery is rated e.g. 100 Amp hours it delivers 1 Amp per hour for 100 hours. So, if you light a bulb that draws 1 Amp it will run for 100 hours. If you draw 2 Amps, it will run for 50 hours etc.
Now, this linear calculation changes when you start to draw more than some 20 Amps and / or when the surrounding temperature becomes higher than 20°C / 60°F. If you draw e.g. 50 Amps, the same battery is empty after 20 minutes rather than after ½ hour. The faster you draw the Amps the less you get out of the battery. This is what the Pf tells us.
In Dido’s case this meant: After one hour of running the watermaker the batteries were 2/3 empty. At the same time the alternator was extremely hot, delivering only some 40 Amps. Topping the batteries would take at least 2 hours of motoring at cruising speed.
So, I was back to a sophisticated question from the very beginning: Where to get the energy from?
What I did:
First I changed the pulleys of the engine. The pulley of the alternator was already the smallest possible, following Nigel CALDER’s recommendations in “Boatowner’s Mechanical and Electrical Manual” (3rd 2005, McGraw-Hill). So, I had to increase the engine’s main pulley. In order to maintain the waterpump’s rpms I also hat to increase the waterpump pulley.
Bigger pulleys on the crankshaft mean more rpm on the alternator at lower engine rpm. More rpm on the alternator mean more Amps. Easy, isn’t it? But when you make the crankshaft pulley bigger, not only the alternator goes faster, but also the waterpump. It is driven by the same pulley and belt. In order to keep the ratio (important for the waterpump bearing and the circulation speed of the cooling water) the waterpump pulley must also be changed to a bigger one.
I measured. I measured again. I measured a third time. Then I went to a colleague who would machine new pulleys. With the new pulleys the alternator should deliver 80 Amps at the engine’s idle speed. And at some 1200 rpm it should deliver 100 per cent, or 110 Amps. Only when getting close to the engines max. rpm (3000) – which practically never happens – the alternator would come close to its rated maximum rpm.
Those were some hard days while waiting for the new pulleys! I was so curious how they would work – and I was so confident that they would seriously contribute to a better performance.
A few days later I got the new pulleys back.
I mounted them, found a matching V-belt, and – found out that they were too big! The V-belt now touched the housing of the raw water pump!
Of course, the whole thing happened a few days before our annual spring trip, so there was simply no time to have new pulleys machined. So, I installed a ball bearing with a screw onto the pump housing, which should deflect the belt a little bit. Of course, this would increase belt wear. But spare belts would solve this problem.
There was also little time for test running the new installation. However, everything was running, and the alternator was charging. So why bother?
, water pump pulley (left, top), ball bearing to deviate the V-belt (center)")
On the spring trip I made some strange observations:
First: The whole system was running indeed. And the alternator was fully charging already at low rpm. Fine. Fine? Had I only flipped over a couple of pages in Nigel Calder’s book! The conclusion of what you can read there simply is: An alternator that delivers about 100 Amps takes about 4 hp from the engine. But I have a 42hp engine, haven’t I? Yes indeed. But at idle rpm of 800 rpm the engine delivers only close to 10 hp. Some 40 percent now were taken by the alternator, which lead to an unstable idle run. And when you shifted into forward the rest of the horsepower was hardly able to turn the propeller. The engine tended to stall. To prevent this I had to increase rpm immediately to about 1100, which normally means 4 knots speed.
But try to maneuver delicately at 4 knots while berthing or so, each time you shift into gear almost or actually kill the engine! And all this was talked about by Nigel Calder just a few pages after the chapter dealing with sizes of pulleys …
Now I had two good reasons to make the pulleys smaller again, which we did once back from our spring trip. Additionally, I installed an old blower to cool the alternator to keep it at a lower working temperature. In summer, however, the system was well balanced:
- Bigger pulleys than the original ones, yet not too big to draw to many hps when idling.
- A cooling fan to keep the alternator at a reasonable working temperature when under heavy load.
Everything nice, and in terms of providing enough electricity a real improvement. I have a very accurate Victron battery monitor on board. When I run the Karcher I adjust it in a way that there is a net draw of no more than ca. 15 Amps (net draw means: anything that the alternator delivers minus the draw of the Karcher, the draw of the booster pump and the draw of the blower/cooling fan for the alternator). This means the usual 1 to 1 ½ hour fresh water production time cost some 15 to 22 Amp hours out of my – meanwhile – 360 Ah battery banks. This is the case when the Karcher is running at ca. 60 percent power.
To tell you the truth:
An additional reason for those attempts to improve the energy situation was something different. I hardly dare to speak about it, because it is like betraying the whole Kärcher concept that numerous people meanwhile have copied (I receive emails on this topic every now and then. It seems as if “Dido’s Watermaker” has somehow become an insider tip within the DIY watermaker community).
 During last winter by chance I found a Danfoss APP (Axial Piston Pump), specifically designed for watermakers (in terms of pressure and flow rate) and at the very upper end of the price range for professional watermaker pumps. It is silent, slim, lightweight, practically maintenance-free, less power-consuming. And it costs USD 2,700. Without anything, no electric motor or any other add-ons.
I found a new one (some are still available) for USD 999.99, still at days where the Euro exchange rate turned out to be an additional advantage. (I usually do not recommend specific suppliers, but in this case, I’ll make an exception because the company was very helpful and supportive. Anyway, you will find it if you google for “Danfoss APP 0.8”: www.bigbrandwater.com. At the moment (2017) the displayed price is high, you should ask them if you want one, however.
Although our watermaker was working perfectly for our needs I never stopped to read everything that I could get. So, I had learned about those rarely used but high-end Danfoss pumps. Finally, I ordered one.
Apart from the simple “I want to have this professional device” there were some pretty good reasons: twice the water at more or less the same power consumption was my rough estimate.
Entering a new era
 The concept of the Danfoss APP is – interesting enough – very similar to the Karcher. Unlike a usual high pressure plunger pump, as a CAT pump or so, the pistons (plungers) are mounted co-axial to the main shaft of the pump. They are driven by some sort of wobbling disk instead of a crankshaft, resulting in lower noise, a bit less power consumption and no need of oil lubrication. The cheap Karcher that we used was that type of pump, too (although with oil lubrication). You need to couple the Danfoss APP directly onto an electric motor, either DC or AC, of about 1.5 kW (better a bit more) or some 2 HP. On youtube you may find a nice presentation on how those pumps work: https://youtu.be/_WLtj_fzPAg Should the link not work search there for Danfoss Axial Pump.
I decided to use an AC motor, due to above mentioned reasons: DC motors of that size are expensive (2 HP continuous duty @ 3600 rpm are somewhat around USD 500), and they are exposed to wear because they use brushes. A comparable AC motor here costs about USD 180. It is an ordinary industrial standard product.
But those ordinary AC motors show one problem: When started the need a very high starting current (about five times the nominal current), which is also true for the Karcher, but the Karcher may be regulated by the above mentioned little control device. With this device, you may “soft start” them and the rpms are easily controlled. The industrial AC motors – basically 3-phase-motors – may not be controlled by that sort of device. However, you may get a “soft start device” for 3-phase-motors for little money. But I decided to use a so called VFD, which gives you full control over the AC motor.
About AC motors
Basically, there are two sorts of AC motors: the so called Universal Motor and the so called Asynchronous Motor. The Universal Motor is easy to control and cheap. You will find it in an electric drill, inside of a vacuum cleaner, or, e.g. inside of the Karcher. It uses brushes and there are practically no motors available that come in a housing. They are rather OEM-products to be integrated into various machine concepts.
The Asynchronous Motor is a standard industrial motor that comes in a certain number of housings, with standard measures, standard ratings etc. They work without brushes and at better efficiency than Universal Motors. They have a fixed rate of rpm. Depending on the mains frequency (60 Hertz in the US, 50 Hertz in Europe) they run at 3600, 1800, 900, 450 rpm (60 Hz) or 3000, 1500, 750, 375 rpm (50 Hz). This depends on the number of “poles”: a 2-pole motor runs at 3600, a 4-pole motor at 1800 and so on. If you want e.g. 2200 rpm you need a gearbox. If you simply reduce Voltage you reduce the kW resp. horsepower, but the rpm remain the same.
All asynchronous motors are basically 3-phase-motors. But you may buy also single-phase-motors, where the missing phases are replaced by a capacitor (further details in Wikipedia). Nonetheless you need some sort of three phases.
 by Hitachi Corp.") The rpm of an asynchronous motor depends on the frequency of the AC. So, if you change the frequency you change the rpm. Not too long ago such devices were developed at affordable prices. A VFD is such a device, a Variable Frequency Drive. What it does sounds simple, is, however, sophisticated: You plug it into the wall socket where you get 115V/60Hz or 230V/50 Hz or whatever. On the output side, you decide what you get there: 0 to 400 Hz at a chosen Voltage. Which means 0 to 24,000 rpm, if the motor could do this (usually the bearings won’t). Now you have full control over your AC asynchronous motor: you start it as slowly as you want (which keeps initial current low) and go up until you think it is fine. Such a device is not cheap. For our purpose, you may calculate ca. USD 300.
The rpm of an asynchronous motor depends on the frequency of the AC. So, if you change the frequency you change the rpm. Not too long ago such devices were developed at affordable prices. A VFD is such a device, a Variable Frequency Drive. What it does sounds simple, is, however, sophisticated: You plug it into the wall socket where you get 115V/60Hz or 230V/50 Hz or whatever. On the output side, you decide what you get there: 0 to 400 Hz at a chosen Voltage. Which means 0 to 24,000 rpm, if the motor could do this (usually the bearings won’t). Now you have full control over your AC asynchronous motor: you start it as slowly as you want (which keeps initial current low) and go up until you think it is fine. Such a device is not cheap. For our purpose, you may calculate ca. USD 300.
So, I bought a standard AC asynchronous motor and a VFD.
The test run (without the Danfoss pump, because it must not run dry) went well. So I mounted everything into Dido’s hull. And then we went for our summer vacation. For security reasons I also took the Karcher with us.
The New Pump In Action? Well, Not Really.
Once on the water I started the very appreciated, very professional, very expensive, very good-looking Danfoss APP by slowly turning the knob on the very appreciated, very professional, very expensive, very good-looking Hitachi VFD. And the water poured out of the brine through-hull: very appreciated, very powerful. I was overwhelmed.
So, I started to close the needle valve to increase pressure. At 20 bar / 290 psi the very professional 3-phase VFD-controlled AC-motor stopped. It was clear that it did not have enough power to run the Danfoss pump under pressure conditions. After several tries I gave up and connected the Karcher again. Everything went fine. Water without ending, even enough for our little washing machine that we have aboard since this summer. But I was sad. It was still the Karcher, not the very appreciated, very professional, very expensive, very good-looking Danfoss APP.
 When we returned from our holidays I tried to find out what went wrong. I disassembled the whole watermaker to test it. And I knew I would not give up until I’d find the solution. But whatever I changed and tried, the result remained the same: The motor seemed to be too weak to run the watermaker. How could this be? A couple of days I made any test that came to my mind. Still no improvement.
One day, at about 10 p.m., I wrote my problem to an electric engineering forum. At 10 past 10 p.m. there was an answer: “Instead of a star-connection use a delta-connection.” (or was it the other way round?). After another hour or so I had learned from Wikipedia that AC asynchronous motors are usually run from 3-phase-electricity, which is (here in Europe) 400 V, compared to the 230 V “household” power line electricity.
When you use a VFD to convert the “normal” 230 V single-phase household electricity into a 3-phase-electricity you won’t get 400V. Therefore, you have to connect the motor in a different way, so that it works also with 3-phases at 230V. Otherwise it lacks power. Um …
The other morning, must have been 6 a.m., I went into the garden to the watermaker. Changing from star- to delta-connection (or was it the other way round?) was 3 screws and done within five minutes.
I turned everything on. I started to close the needle valve. The pressure went up slowly. It reached 20 bar / 290 psi. I went further and – it worked!
 Now it works at incredible rates. With the Karcher I used 3/8”-hoses both for brine and permeate. I had to change to ½“-hoses for the brine, because it is really too much now! The production rate (with selfmade test seawater from the tank) has almost doubled! At those rates the power consumption is +20 per cent compared to the Karcher. If I stay at the same power consumption as with the Karcher the permeat flow is still 70 percent more than with the Karcher.
Another – probably even more important – effect has to be mentioned: The Karcher is at the lower end of the minimum flow rate that is demanded by FilmTec, which might lead to premature clogging of the membrane, in the long run. Now, with the Danfoss APP, the brine flow rate is high enough to flush the membrane when in use. So, this might extend the membrane’s life.
So far, we have no practical operating experience, as this all happened only after our summer vacation. But I shall update this section after our spring trip 2012!
Conclusion
Do you need the Danfoss APP plus the additional hurdles instead of the Karcher, or any other high-end pump from CAT, Wanner or so? Frankly speaking: No, not at all. The Kärcher-concept, which makes the whole thing so attractive, is a fantastic, reasonable way to start with watermaking. You learn how it works, the system does what is expected, at affordable costs. Even if you cross an ocean it might be cheaper and still reliable if you put 2 or 3 Karchers as spare parts somewhere on the boat. And should you once find that you want to up-grade, you still have this option. We do not need the Danfoss pump, we still could go on with the Karcher. But it is fun to play and try and tinker, isn’t it?
Status 2016
I suppose we are now getting towards the end of the story. The whole installation works flawlessly. We have added a second membrane. It works like this: Instead of pumping the brine over board it passes a second membrane. So, with the same effort the output of fresh water has now almost doubled. Our fresh water tank is not bigger than before (65 liters / 17 gal.), but instead of one hour the watermaker needs 30 minutes to refill the water tank. This saves a tremendous amount of energy.
Finally, there is not much left to say. Our DIY watermaker works flawlessly. The Danfoss pump easily delivers 60 to 80 liters (16 to 21 gall.) fresh water per hour. It could make up to 120 liters (31 gall.), but we do have our restrictions in terms of energy. If you can provide 2.5 kW for a period of 1 to 2 hours constantly, you’ll get the maximum of the membrane’s capabilities. Our setup only allows some 1.2 kW, which simply means about half the performance.
The Karcher would be a good point to start with, and even a solution for ever, given that you buy a new one every now and then.
Some friends tried to power their systems with a medium sized portable genset (e.g. Honda 2 kW). They are, however, not really happy, as the noise of those portable gensets is quite annoying when running an hour or two.
In my opinion doing it the DIY-way has one major advantage: you thoroughly know your watermaker. Whatever happens, you’ll know what and how to fix it.
For us the WM is a major contribution to the quality of our 2 months’ holiday on the Adriatic.